
| The floor plan above shows the parts of the small temple of Amun which were built during the reign of Hatshepsut or Thutmosis III. The red lines (I-----I) along the walls of the chapels built by Hatshepsut mark the parts which had been decorated by Hatshepsut - all other parts of the walls (I-----I) were either decorated by Thutmosis III or sketched by Hatshepsut but carved for Thutmosis III (according to Hölscher. |
| The designation of the inner sanctuaries with capital letters is based on Lepsius and continually used by Hölscher. Lepsius (Denkmäler, Texte III, p 150) assigned the letter L to the 1st central chamber, the adjacent chamber to the north was given the letter M and the room to the south was given the N. He used the same procedure to assign letters to the western row of rooms, respectively: O, P, and Q. |
| Porter and Moss (P&M II, Plan XLV) employed roman numerals using roman I for the 1st central chamber (L) then the following numerals were assigned in clockwise rotation (N = II, Q = III, O = IV, P = V, and M = VI). |
| Neither scheme reflects the relation of each chamber to its neighbors. |
| In the most recent publication the "Epigraphic Survey, Oriental Institute, Chicago" introduced names for the rooms which refer to the ritual context and relief decoration of the appropriate room (OIC Publications 136. Medinet Habu - The Eighteenth Dynasty Temple I, The Inner Sanctuaries. 2009). These names have been also included here in the brackets. |

| Above a reconstruction of the small temple of Amun after the temple had been extended by Thutmosis III (Hölscher, 1930) |
| All in all the 6 cult chambers have so been preserved as they were established by Hatshepsut. On the door frame of the southwest chamber the dedication inscription is reads: |
| The Good Goddess, Lady of The Two Lands, King of Upper and Lower Egypt, Maat-ka-Ra, beloved of Amun-Ra, King of the Gods, daughter of the Sun, of his body, his beloved, Khenemet-Amun Hatshepsut, (she) has made it as (her) monument for her father to Amun, Lord of the Thrones of The Two Lands, Lord of Heaven, he may give her all life and duration like Ra, for ever." |
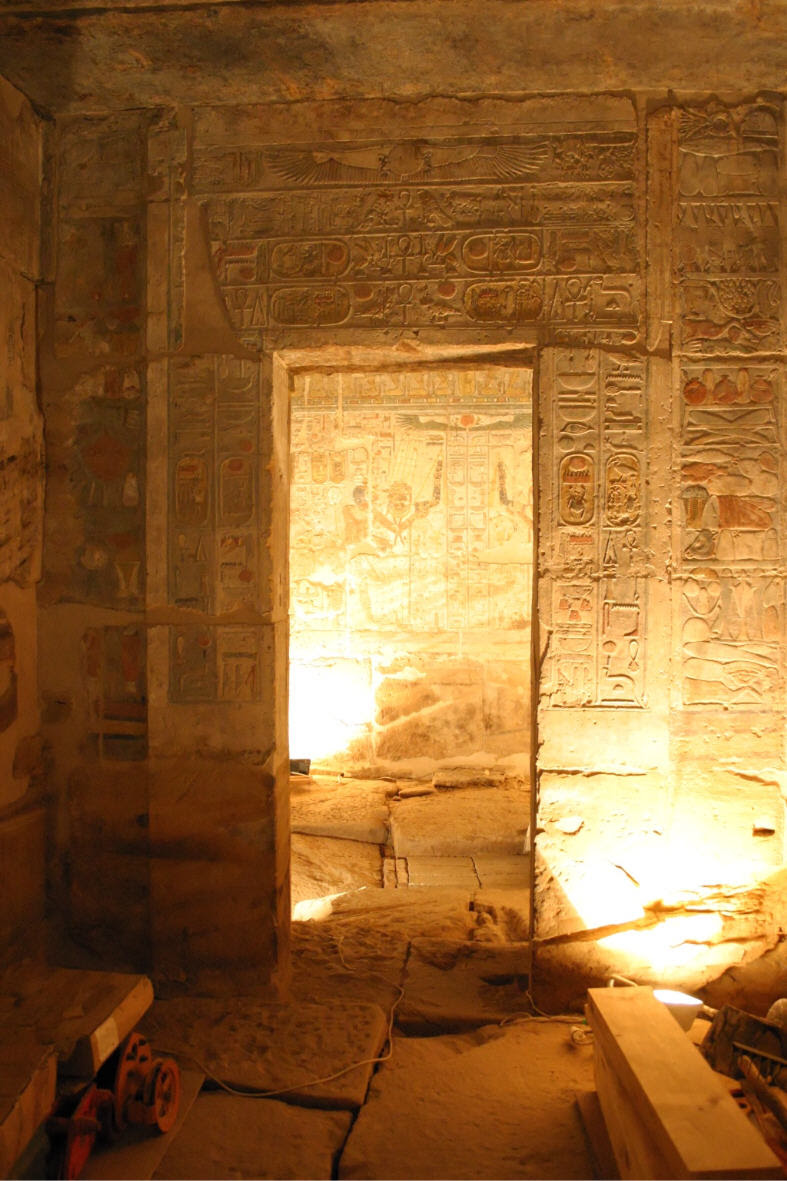
| The central chamber L (P&M Room I; Dyad Chamber) in the first (east) row is larger and higher than the others rooms and it is the only one which received light through an opening in the roof. At the time of Thutmosis III a colossal dyad made of granodiorite stood in the center of chamber L. Hölscher found 3 major pieces of the 3 m high statue, the part with the heads, larger sections of the knees of both figures, and most of the front of the base. Based on these fragments he tried to reconstruct the dyad (see drawings below). |
 |
 |
| The two illustrations show the reconstruction of the dyad by Hölscher (1930). |

| The photo shows the dyad in Room L. Facing the dyad it showed on the right probably Amun and on the left (as indicated by the cartouche on the belt) Thutmosis III seated side by side. With the exception of the cartouche on the belt of Thutmosis III. and the symbol of the unification of the Two Lands on both sides of the seat the statue does not show further inscriptions. |
| During their recent work the team of the Oriental Institute, Chicago, has found a large number of additional pieces, reconstructed the dyad and re-erected it in chamber L (see photo above). |
| Because the colossal dyad was larger than the door opening, it was necessary to erect the front (east) wall of the chamber after the dyad had been put up. Furthermore, the colossal dyad completely hides the door which leads from from room L into room O. The dyad must have been very important because in contrast to all other statues erected in the cult chambers it was directly illuminated by means of a small light well cut into the ceiling. |
| During the coregency of Hatshepsut and Thutmosis only the western wall of room L had been decorated (see photo above and following photo), while all other walls were carved during the sole reign of Thutmosis. |
| However, trace of her cryptogram on the upper western part of the north wall indicate that the decoration had been started during her reign but her decorative scheme had been suspended by Thutmosis (who employed a Xkr-frieze). |
| Furthermore, also the inscriptions on this wall still show traces of the decoration done under Hatshepsut, i.e. in the cartouches as well as in among the titles were one can still read "Nfr nTr.t = Good goddess" |

| This photo shows a view into room L (taken through a hole in the door). On the right it shows a part of the dyad, the scene in the left corner Thutmosis III welcomed and given "life" by Amun. The doorway to room O is completely hidden by the dyad, only the door jambs with cartouches can be detected. Right of the doorway there is a similar scene (see photo of the dyad above). |
| The eastern wall of room L is decorated on both sides of the doorway by a scene in which Thutmosis III is embraced by Amun. |
| The decoration of the southern wall shows (west of the doorway to room N) Thutmosis III presenting a heap of offerings to an enthroned Amun. |
| The northern wall is decorated with two scenes: the eastern scene shows Thutmosis III. censing and pouring a libation before the ithyphallic Amun, the western shows the king presenting offerings to the enthroned Amun. |
| Like all three western rooms about half of room O (P&M Room IV; Sanctuary of Amun) was decorated by Hatshepsut. According to Hölscher here only the names were changed beneath the doors by Thutmosis III (to Thutmosis I. or II). |
 |
The east wall of the room O had been decorated to both sides of the
entrance with one scene each.
On the northern side Thutmosis III. is embraced by Amun and is given "Life",
name and figure of the king are original. On the southern side (see left; drawing from: OIC Publication 136. Medinet Habu - The Eighteenth Dynasty Temple I, The Inner Sanctuaries. 2009; plate 33) originally Hatshepsut was embraced by Amun and was given "Life": However, the figure of the queen was erased and replaced by an offering stand with flowers. Also the name of the queen was deleted under Thutmosis. Nevertheless figure and name are clearly recognizable. |
| The west wall shows two symmetrical representations of an Amun seated before offerings. Above of these scenes there is a frieze with Hatshepsut cryptograms and in the center of this frieze a cartouche of the queen has been preserved (i.e. the signs had been chiseled out but are still readable). |
| On the left (southern) wall 2 scenes are found: 1st, on the left (southern) side the king, followed by his Ka, is shown offering pellets of natron (= bd-natron) to Amun, 2nd, on the right (northern) side originally Hatshepsut was depicted offering nTrw-natron to Amun. |
| On the right (northern) wall there was only space for one left of the passageway to room P: originally Hatshepsut (figure erased and replaced by a pile of offerings; text erased) was shown giving pellets of incense to Amun. |
| Even if no remains were found, a cult statue of Amun might have stood in the center of this room - according the representation on the west wall and the inscription between the symmetrical representations of the enthroned Amun this was probably a seated statue of Amun, the " King of Gods ". |
| Room P (P&M Room V; Naos Chamber) which is only accessible from room O is likewise decorated with offering scenes before Amun, but according to Hölscher the decoration does not suggest the a statue had been erected here. |
| A double scene on the western wall shows the king censing before Amun (southern, left scene) and performing the ritual "jrt wSA Saj = Pouring out sand (Hannig, Deutsch-Ägyptisch, S. 1083)" before the ithyphallic Amun (northern, right scene; OIC Publication 136, plate 49). |
| The southern wall shows the Thutmosis III offering milk to Amun. |
| The northern wall contains two scenes: the western (left) scene showed Hatshepsut (replaced by an Ankh and two offering tables with flowers) "pouring water" over Amun and the eastern (right) scene showed Hatshepsut (replaced by an Ankh), followed by her Ka, "pouring water" over the ithyphallic Amun. |
| The eastern wall (rear wall of room M) shows two scenes: the southern (right) scene shows Thutmosis III clothing the ithyphallic Amun; the northern (left) scene showed Hatshepsut (replaced by an offering table) before Amun. |
| Among the inner sanctuaries of the Small Temple of Amun the decorations of the walls in room P appears to be very special. |
| In all other room the king is depicted facing consistently inwards and culminating with the center of the ritual focus on the west walls of the rooms O and Q, where in each case the king stands twice before a symmetrically depicted enthroned Amun (room O) or, respectively, before a symmetrically depicted ithyphallic Amun (room Q) . |
| However, in room P the direction of the cult actions turn out to be different as expected. The action of the king does not culminate on middle of the western wall, but in the northwest corner opposite the entrance. There, an ithyphallic Amun (facing south) is shown on the western wall back to back with a striding Amun (facing east) depicted on the northern wall. |
| Since only the northern (and half of the eastern) wall had been decorated during the reign of Hatshepsut this direction must be attributed to Thutmosis III. |
| Today room P contains an unfinished, undecorated cult shrine (Naos) made of pink granite, which was probably brought in after the 4th century BC |
| Room N (P&M Room II; Vestibule) was decorated almost completely by Hatshepsut, and also completely altered by Thutmosis III. Only one cartouche of Hatshepsut has been preserved on the eastern side as a part of the frieze. The frieze itself consisted, like always when it was decorated by Hatshepsut, of her cryptogram - here again the Kas were destroyed. While rooms O and P had been dedicated to Amun, in rooms N and Q the ithyphallic manifestation of Amun was worshipped here. All scenes in room N show one of the three Thutmoside kings, I to III, always offering before Amun. In the passageways already cartouches of Amenhotep II are even found. |
| The eastern wall shows two scenes: on the northern (left) side Hatshepsut (name and text changed to Thutmosis II) was shown presenting a loaf to Amun, on the southern (right) scene Hatshepsut (name and text changed to Thutmosis II) was shown censing and pouring a libation before the ithyphallic Amun. |
| The southern wall of room N shows totally 4 scene, in all of them the name of Hatshepsut and accompanying text had been changed. From left (east) to right (west) the scenes show: Thutmosis III offering to vessels with water before Amun, Thutmosis I presenting a nms.t-jar before the ithyphallic Amun, Thutmosis II offering Sa.t-bread before Amun, and Thutmosis II presenting lettuce to the ithyphallic Amun. |

| The original decoration in the name of Hatshepsut was repeatedly changed and was supplemented. As can be proved Thutmosis III has replaced representations of Hatshepsut - like in many other buildings - by his person or with other representations, e.g., offering tables with gifts. For instance, in the picture shown above - first scene on the southern wall of room N - Thutmosis III offers before Amun (photo: Oriental Institute, Chicago). |
| The northern wall of room N shows tow scenes: the left (western) scene showed Hatshepsut (name and text changed for Thutmosis II) giving mild to Amun, the right (eastern) scene showed Hatshepsut (name and text altered for Thutmosis I) offering wine to the ithyphallic Amun. |
| Doorway from room N to room Q. Both sides of all entrances to the 6 inner sanctuaries are decorated in a similar way. Depending upon the available space 3 or 4 horizontal registers are used above the door. The highest register always shows in the center the winged sun disk with two hanging uraeus. On the right of and left of the winged sundisk follows a text with a reference to " Great God, the Behedeti". |
| Below this register at least two registers follow which contain symmetrically arranged to an anx-sign possible the Horus-name, but always the throne and birth name of - oppositely arranged - two kings (here on the left: Thutmosis II, on the right of Thutmosis I, which both replace here the original names of Hatshepsut. |
| The left door jamb bore originally the names of Hatshepsut, but were recarved with those of Thutmosis II, the right jamb bears the original names of Thutmosis III. |
| Right and left the doorframe is flanked with piles of offerings. Each pile is surmounted by a Heaven-sign. |
| Most likely, room Q (P&M Room III; Sanctuary of the Ithyphallic Amun) contained a statue of the ithyphallic Amun although no remains have been found. Half of the room was decorated by Hatshepsut as indicated the frieze with her cryptogram. Here on the west wall also her cartouche has been preserved. As in all other rooms Thutmosis III has finished the decoration and has altered the already existing scenes. |
| The west wall shows a symmetrical representation of the ithyphallic Amun embraced by Thutmosis III (northern, right side) and Thutmosis II (southern side) who replaces Hatshepsut. Behind every king his Ka is depicted. |

| The south wall shows an interesting composition. On the eastern (left) side of this wall the king sacrifices clothes to the ithyphallic Amun (see photo below). Behind Amun one recognizes that a part of the relief has been chiseled out - i.e. originally Hatshepsut had been shown here. Further west (right) one recognizes a pile of offering raised before the enthroned Amun (next but one photo below). |
| This was a rather "intelligent" way to remove Hatshepsut, because now after the removal of her figure Thutmosis III stands before both manifestations of Amun at the same time! |


| The northern wall of room Q shows two scenes: the left (western) scene originally showed Hatshepsut (name and text altered for Thutmosis II) with a pile of offerings before the enthroned Amun, the right (eastern) scene shows Thutmosis III offering +sr.t-beer to the ithyphallic Amun. |
| . |
| On closer examination the decoration of the inner sanctuaries indicates that the temple is provided with two separate ritual axes, each devoted to different aspects of Amun. |
| Along the central axis, which consists of the two rooms L and O, the striding or enthroned Amun is in the most scenes the recipient of the offerings. The ithyphallic Amun is shown only once in these two rooms. |
| In contrast, in the two southern rooms N and Q the primary addressee of the ritual suites is the ithyphallic Amun who appears in room N in four of eight and in room Q in four 4 of six scenes. |
| Room M (P&M Room VI; King's Chamber) is separated from all other rooms. The room was decorated for Thutmosis III. |
| Both longitudinal walls show on the side of the door (eastern part of the wall) offering bearers, in front of them in each case the god Iunmutef is depicted. Opposite to Iunmutef (in each case on the western side of the wall) the enthroned Thutmosis III is shown and behind - standing - him Meretre-Hatshepsut (the mother of his successor Amenhotep II). According to the inscription the god Iunmutef performs the royal offering four times for the Ka of King Men-kheper-Ra, while before Thutmosis and Meretre-Hatshepsut priests (depicted below the list of offerings) prepare a ritual meal. Since the Iunmutef is offering to the Ka of the king here stood presumably a Ka-statue of the king (Waitkus, 2008). |
| The south wall is shown on the following drawing (taken from: OIC Publication 136. Medinet Habu - The Eighteenth Dynasty Temple I, The Inner Sanctuaries. 2009; plate 87). |

| The western rear wall shows 2 symmetrical scenes in which Thutmosis III offers cool water (southern side) or wine (northern) to the enthroned Amun. |
| The fact that the cult is performed by the god Iunmutef shows unambiguously that the king, or his statue, was worshipped here. |
| It is quite notable to find a representation of Amun on the west wall of the chapel because he is not participating in the benefits of the cult in this room. Perhaps, a statue of Amun was mounted here in addition or Amun, as the "Lord of the House", was, so to speak, a guest while the king was worshipped in his house? |
| The doorway to room M has been obviously established later than the other walls. |
| The eastern exterior of the chapels shows from left to right three scenes: |
| - left of the entrance to the chapels two scenes (see photo below, composed from 3 single shots) are shown: in the left (southern) scene Thutmosis III is led by Atum and Month from the left to the right, in the right scene Thutmosis III is embraced by Amun. |

| - right of the entrance to the chapels (located between the doors to room L and M) Atum, coming from right, leads Thutmosis III to Amun. |
Comments
Post a Comment